Dodge50.co.uk
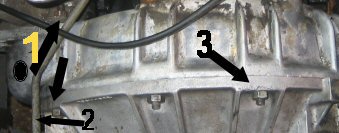
You Don't need to remove the starter motor but we did because it needed replacing anyway . You do need to remove all wires to it though. You also need to remove the wires to the fuel solonoid shut off valve, these are situated just to the right of the starter motor (looking in from inside cab) at the side of the fuel injector pump, attached to what looks a bit like half a spark plug (bottom Half). Also remove the lead going to the oil pressure sensor mounted on the engine block nearby. There is a pipe (arrow number 2) which runs from the vacuum pump / exhauster towards the vacuum tank under the vehicle, you need to undo this at the engine / exhauster end and use a cable tie to clip it out of the way. You need to undo all the bell housing nuts top and bottom arrow 3 and the un numbered one and leave one just on at the bottom, at this point you NEED to have the trolly jack ready underneath with a block of wood between the engine sump and the trolly jack. This is where you NEED to have the engine hoist ready and be prepared for the final tug and pull. The trolly jack needs to placed with a decent size block of wood directly under the rear of the sump, avoiding contact with the axle and the track rod. BE VERY CAREFULL of the track rod!! You can with a bit of care get the trolly jack to go over the axle, the nearer the middle of the sump the better. The trolly jack and hoist need to be pulled at the same time, depending on the surface you are working on affects the ease of removal, as we had small stones as our work surface we used some wooden boards to run the trolly jack on, the hoist was so big and heavy it made not a lot of difference.
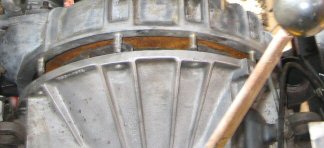
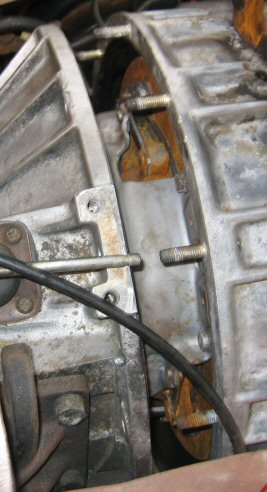
Above is the first point of seperation of the bell housing where the engine is supported by the engine hoist and the trolly jack. Carefully pull on the hoist and the trolly jack at the same time and the engine should start to seperate from the gearbox belhousing, if you find it wont come apart make sure you have undone everything, there are no wires or cables trapping it and you have got the wheels on the trolly jack and hoist pointing in the right direction.
|
Recomended tools for the job. 17mm spanner / socket. Adjustable spanner.
|