Welcome
to another splended and helpful page from ©dodge50.co.uk |
|
|
S46, S56, S66, RB75 +4X4
|
Phaser Engine Section12A-07 Cylinder head assembly To remove and to fit To
remove 2 Disconnect the battery terminals. 3 Engine
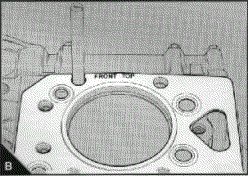
types AA and YA Remove the air filter/cleaner hose at the induction manifold. 4 Remove the pipe which is fitted between the cold start device in the induction manifold and the fuel fitter. Disconnect the electrical connection. 5 Engine types AB, AD, YB and YD: Remove the boost control pipe which is fitted between the front of the induction manifold and the fuel injection pump. 6 Remove the induction manifold. 7 Engine types AB, AC, AD, YB, YC and YD: Disconnect all connections to the turbocharger and remove the turbocharger. 8 Remove the exhaust manifold. 9 Remove the low pressure fuel pipes which are fitted between the fuel injection pump and the fuel fitter. Where a Bosch fuel injection pump is fitted, keep the fuel outlet banjo bolt with the fuel injection pump. Remove the fuel pipe fitted between the fuel lift pump and the fuel filter. Remove the fuel filter bracket together with the fuel fitter. 10 Remove the high pressure fuel pipes. Where a Bosch fuel injection pump is fitted, ensure that a separate spanner is used to prevent movement of the fuel injection pump outlets when the connections of the high pressure pipes are released. Fit suitable covers to all open connections on the fuel injection pump. 11 Remove the atomiser leak-off pipe. 12 Remove the atomisers. Fit suitable covers to the nozzles and the open connections. 13 If a compressor is fitted: Remove the coolant pipe which is fitted between the cylinder head and the compressor. Then remove the coolant pipe which is fitted between the by-pass connection and the compressor. 14 Release the clip of the coolant by-pass hose at the cylinder head. Release the setscrews and remove the coolant by-pass connection and the hose. 15 Disconnect the coolant temperature sender unit. 16 Engine types AB, AD and certain AA: Remove the oil cooler. 17 Remove the rocker cover, operation 12A-01. 18 Remove the rocker assembly, operation 12A-02. 19 Remove the push rods. 20 Release the cylinder head setscrews evenly and gradually in the reverse sequence to that shown in 12A.08/A or B. Check the setscrews for distortion with a straight edge (Al) held along the setscrew (A2). If there is a visual reduction in the diameter of the thread that has not been in engagement with the cylinder block (A3), the setscrew must be discarded. 21 Remove
the cylinder head and put it on a surface that will not damage the face
of the cylinder head. Do not use a lever to separate the cylinder head
from the cylinder block.
|
Dodge
50 series vehicles S46, S56, S66, RB75 +4X4 |
©
Dodge50.co.uk™
2002 |