Welcome
to another splended and helpful page from ©dodge50.co.uk |
|
|
S46, S56, S66, RB75 +4X4
|
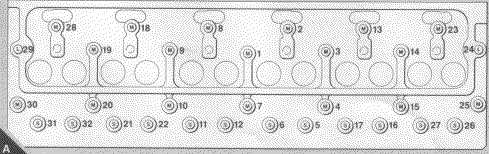
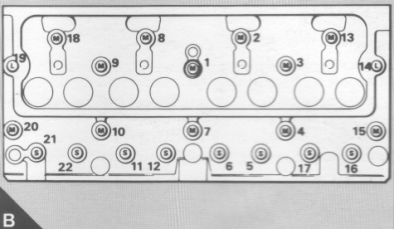
Phaser Engine Section12A-07 Cylinder head assembly To fit Special
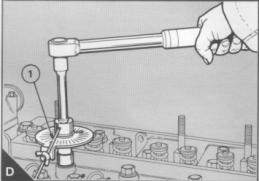
tools: 1 Clean the bottom face of the cylinder head and top face of the cylinder block. Ensure that there is no debris in the cylinder bores. 2 Put the cylinder head gasket in position; the cylinder head gasket must be fitted without jointing compound. It is stamped "FRONT TOP" for correct assembly (11 2A.07/13). 3 To hold the gasket in the correct position when the cylinder head is fitted, fit two suitable 1/2 UNF studs (C) in positions 15 and 20 (B) or positions 25 and 30 (A). Put the cylinder head in position. 4 Lightly lubricate the setscrew threads and the thrust faces of the setscrew heads. Engage some of the setscrews in their correct positions (A or B) and remove the guide studs. Engage the remainder of the setscrews in their correct positions. 5 Gradually and evenly tighten the setscrews to 110 Nm (80 Ibf ft) 11,1 kgf in the sequence shown in A or B. 6 Repeat paragraph 5 to ensure that all the setscrews are tightened to the correct torque. 7 Tighten the setscrews, in the correct sequence, a further part of a turn according to the length of the setscrews, see A or B. Short setscrews (S) must be turned a further 150° (2.5 flats). Medium length setscrews (M) must be turned a further 180° (3 flats). Long setscrews (L) must be turned a further 210° (3.5 flats). A special tool (D) can be used for this operation. Fit the tool between the socket and the handle. Position the stop (D1) against a suitable protrusion on the cylinder head to prevent movement of the degree dial in a clockwise direction. Turn the pointer to align with the zero mark on the degree dial. Tighten the setscrew until the pointer on the tool is at the correct angle for the length of setscrew. If no tool is available, make a suitable mark on the cylinder head in line with a corner of each setscrew. Make another mark, at the correct angle (counter-clockwise), on the edge of the flange of each fastener according to the length of the setscrew. Tighten each setscrew in the correct sequence until the marks on the flange are next to, and in line with, the marks on the cylinder head. 8 Put the push rods in position. Ensure that the end of each push rod fits correctly in the tappet socket. 9 Fit the rocker assembly, operation 12A-01. 10 Set the valve tip clearances, operation 12A-05. 11 Fit
the atomisers.
|
Dodge
50 series vehicles S46, S56, S66, RB75 +4X4 |
©
Dodge50.co.uk™
2002 |